Reporting on Reports

As a Salesforce Admin, I find myself repeating many of the same tasks when I move to a new company and am in a new (new to me, anyway) Salesforce org. One of the projects that seems to crop up everywhere I go is report and dashboard cleanup. (I know, right? It’s so tempting to take the “Create Report Folders” and “Manage Reports in Public Folders” permissions away from everyone. Someday… but I digress.)

The first time I began a major cleanup of reports, dashboards, and their folders, I thought with absolute confidence, “This should be easy, I can just run a report on reports!”

Followed immediately by, “Uh, wait… is this all of the info I can get?” Right. In the standard “Reports” report type, that is all the info you can get.

Sound familiar? Allow me to introduce you to two of my favorite custom report types. These report types answer the two questions that are most important to me every time I start a report and/or dashboard cleanup.

Why: If you are thinking about turning on enhanced folder sharing, one of the most important things to know when determining levels of access is who created each folder.

How: Go to Setup | Create | Report Types and click “New Custom Report Type.” Select “Reports” as the Primary Object. Give your report type a name and description, and select Deployed so that you can start using it right away.

Then click Next, and you will see this nifty little Venn diagram. We do not need to add additional objects to this report, so this is fine the way it is.

Go ahead and click Save. After it is saved, scroll down to the “Fields Available for Reports” section and click “Edit Layout.” On the right-hand side of the edit page, in a box containing the available fields, click “Add fields related via lookup.”

A box will pop up with some lookup options. Click on “Folder” and there they are! All of the folder fields that we didn’t have before!

Select all of them, and click OK. Then click Save. (Optionally, you can create a new section before you save, if you want to keep the folder data separate from the report data.)

Why: Ever try to delete a report that you know is out of date or not useful anymore, and you get that error message – “Report cannot be deleted – one or more dashboards depend on this report” – but it doesn’t tell you which dashboard? Yeah, that.

How: Go to Setup | Create | Report Types and click “New Custom Report Type.” This time, select “Dashboards” as the Primary Object.

Click Next, and this time, you will want to add a related object – Dashboard Components.

Save, then scroll down and click “Edit Layout.” This time, select “Dashboard Components Fields” from the dropdown menu in the fields box, and then click “Add fields related via lookup.”

In the box that pops up, click on “Custom Report,” select the report fields that you want to include, and click OK. Then Save.

And just like that… two new report types that will quickly tell you all you need to know about your reports and dashboards. So what are you waiting for? Happy cleaning!

Salesforce1: The Good, the Bad, and the Pretty

If you have been a Salesforce admin for more than ten minutes, chances are you’ve heard of Salesforce1.

The marketing efforts around Salesforce1 – the mobile app in particular – are tremendous. And naturally, my users have come to me asking about it. So, with the help of documentation and the Success community, I began my quest for Salesforce1 optimization.

Here are my thoughts around some of the capabilities, based on my mobile configuration experience and feedback from my users.

First, the Good:

  • Cool Stuff in the Settings! In the Settings – Setup | Mobile Administration | Salesforce1 | Settings – you can do the following:
    • Enable Salesforce1 – This is the first thing you’d want to do.
    • Enable Account News – Very useful feature for Sales!
    • Run Duplicate Rules – I recommend this if you are using any duplicate rules. Don’t let bad data come in by way of the mobile app! It’s too easy to create clutter.
    • Allow Salesforce1 to import contacts from the mobile device – It is worth noting that this does not automatically import anything into Salesforce from your device. It simply adds an “Import from Device” button to the screen when you create a new contact, allowing you to select from your list of contacts.
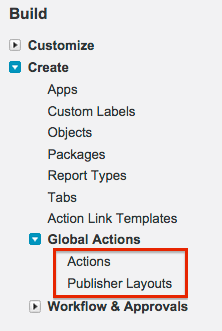
  • Global Actions: These are the same actions that you may have seen in Chatter, such as “Post,” “Link,” “Poll,” etc. If you do not have any global actions in place, you can add them by going here:

These actions act as shortcuts for creating new records, tasks, events, etc. They are especially useful to mobile users because you can give each action its own layout to display only required fields, in a wonderfully clean view.

Click “Actions” for a list of existing ones – Salesforce provides many default actions that you can use – and from there, you can create new actions or modify layouts. Click “Publisher Layouts” to reorder the actions, or to create separate global actions for different profiles (just like object page layouts). Note: they will be in the same order on both the mobile app and the full Salesforce site.

  • Navigation: Go to Setup | Mobile Administration | Mobile Navigation to control what is available in the navigation menu of the app. Note: you cannot control the list of objects that is also in the navigation menu – all objects that a user can access will automatically be there. Vote for this idea if you think that we need more control over which tabs are visible.
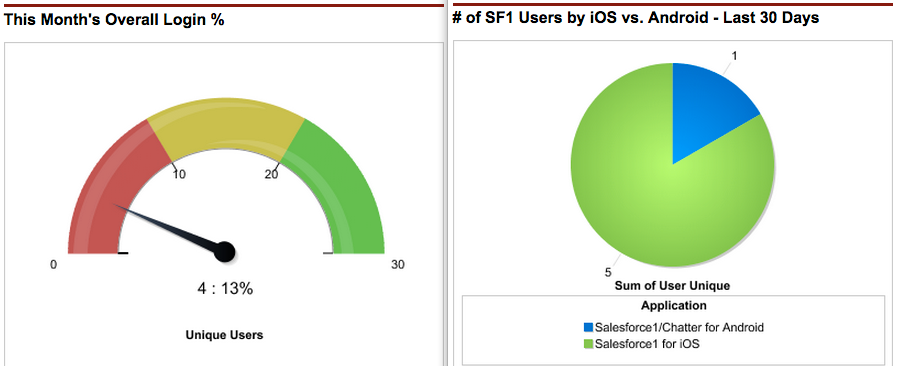
  • Adoption Reporting: Want to know who has been accessing Salesforce via the mobile app? This handy reporting package will show you. Huzzah! Now I don’t have to figure out how to report on it. It’s been done for me.
  • Adoption Manager: This is brand spanking new. I have not even had a chance to try it out yet. However, it sounds like something that would encourage users to use Salesforce1, and also help them use it more efficiently. As admins, we need all the help we can get in that department, so this is on my “good” list even though I have not investigated it fully.

Now the Bad:

  • Page Layouts, or lack thereof: There are no separate mobile layouts. Unfortunately, the way that my users (and yours, I suspect) interact with the system while sitting at their desks is completely different from how they interact while on the go, using their mobile device. Vote for this idea if you feel that this is a necessary feature. Note: There is a sort of a workaround for page layouts – simply make sure that all of your most important fields are at the top of the page. This will help make the information easier to view in the mobile app – and really, isn’t it high time we all cleaned up our page layouts anyway?
  • No Email Templates: You cannot access email templates while sending email through Salesforce1. This is especially unfortunate for traveling sales reps who typically send branded templates after they meet with potential customers. Again, the idea is here for voting.
  • No Case Comments: There are entire teams who work in Cases 90% of the time or more. Almost every organization who uses cases also utilizes case comment functionality. Unfortunately, case comments cannot be added in Salesforce1. But – you guessed it! – there’s an idea for that, too.
  • No Task Reminder notifications: You can go to Setup | Mobile Administration | Notifications | Settings and determine (for your entire org) if you want to allow in-app notifications, push notifications, or both. Within the app, users can then select what kind of notifications they want to receive from the app. However, the list is limited, and does not include things like task reminders (which we normally see in a browser pop-up). Vote for this idea if you think task reminders should be included as an app notification.
  • No ability to add Contact Roles to Opportunities: You can view the Contact Roles on an opp from the related list, but you cannot add new contact roles, or edit the existing ones. Believe it or not, that idea was not out there yet! So here it is. You’re welcome.
  • No ability to Create an Opportunity from the Contacts related list on an account (Known Issue): If your process for opportunity creation is for the sales rep to create new opps from the contact, then this will be a problem for you. A fix is scheduled for Winter ‘16 – however, combined with the lack of ability to add contact roles to an opportunity, you could end up with a bunch of opps that have no contact roles if they were created in Salesforce1.

It’s so PRETTY!

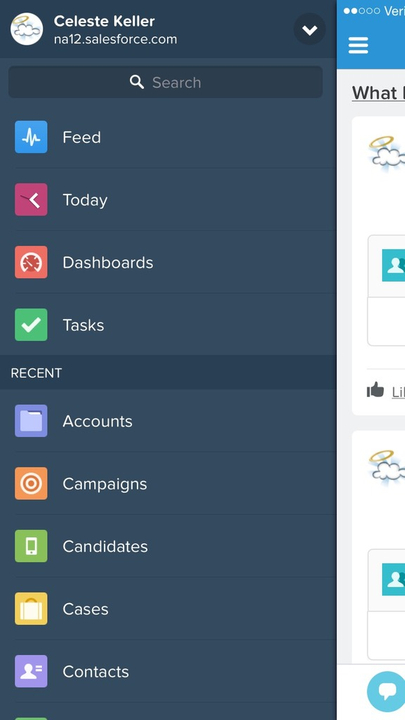
  • User Interface: I really like the user interface of Salesforce1. It’s clean, modern, and easy to navigate. If you are comfortable with apps in general on your phone or tablet, then this one will feel just as intuitive. And my dashboards look great!
  • Company Branding: What a great feature! You can go to Setup | Mobile Administration | Salesforce1 | Branding and upload company logos and set a color scheme. Very slick. Marketing will love you for it, and so will upper management.

My Conclusions:

This was a fun learning experience! Salesforce1 provides a way for my users to quickly edit and create records from anywhere. I have no doubt that Salesforce will continue to improve the mobile experience in upcoming releases, and I will let users know what they can do within the app. But I will also let them know what it cannot do, just so they are aware of its limitations. The things on my “bad” list severely impact most of my users, so I really hope that someday the mobile app has more functionality. Vote up those ideas!

And thanks to my fellow admins for posting these ideas on the IdeaExchange – keep it up! One of the best things about Salesforce is the way they use customer ideas in their product roadmap. The more we ask for them, the more improvements we will see.

Custom Links: The Shortest Distance from Point A to Point B

Don’t you hate it when you realize that there are a bunch of records still owned by an inactive user? This is one of my pet peeves, and unfortunately, it is also usually my fault. One of my biggest challenges has always been to remember to transfer ownership of records when I deactivate a user. And in a complex org, there are a lot of records to transfer. The mass transfer tool is great for some objects – but what about the records you can’t use it on? How can I remember to check all of them? What if I’m not sure which of my 200 custom objects need to be transferred? I swear I ran these reports before for another user, but where did I put them…?

Seriously?

Seriously. The solution was so easy, I wish I had known about it ages ago! All I had to do was add a set of custom links to the User page layout, one per object, each link opening a report of records owned by that particular user.

I started by creating a folder to keep these reports in. I locked it down to our Administrator role because no one else in my org deactivates users – but you will want to apply the security that makes the most sense to your folder.

Then, I created a report for each object. The most important thing to remember here is, “Record Owner = “ must always be your first report filter. After that, you can add whatever filter criteria you like – for leads, I make sure that they are unconverted, because converted leads will show up in my account and contact reports anyway.

For cases and opportunities, I only need to change the owner if they are open, so that was my 2nd filter on those reports.

Once your reports are done, you can create the custom links. Tip: It helps to have the report open in another tab when you are ready to create the link. Go to Setup | Customize | Users | Custom Links, then click the “New Button or Link” button. Give it a label (this is how it will appear on the page), make sure your Display Type is “Detail Page Link,” select the behavior for opening the report, and make sure the Content Source is “URL.”

To start the link, the first thing you want is the report ID – include the forward slash just before the ID.

Then, you want to add “?pv0=” immediately after the report ID. And finally, select “Name” from your list of merge fields.

My finished link looks like this:

Something to keep in mind for future custom links is, you can use any available merge fields – just make sure they match the fields that you use in your report filters. If you really want to get crazy, you can pull in up to 10 merge fields to match your report filters. The 2nd filter would be pv1, then pv2, etc., just separate them with ‘&’ in the URL.

Once you have a link for every report that you’d want to run, you just need to add them to the layout – go to Setup | Customize | Users | Page Layouts and add them to the Custom Links section of your User layout.

Voila! Now I click on each link, and a report opens up in a new window, showing me which records are owned by that user. I can then use the Mass Transfer Records page, or (for the ones that are not supported by Mass Transfer, like Contacts and Opportunities) I can quickly export the data and do a mass update. I can also export and email these lists of records to the user’s manager if they need to reassign them across a team.

This is just the beginning… next, I will add the links for open tasks, and for custom objects that need to be reassigned. And with these reports so easy to run, it’s a no-brainer to make it part of my user deactivation process. Think of all the other ways that this can be useful, on other objects – and see what you can come up with!

Security 101: When in Doubt, Lock It Down

Both experienced and newbie admins can always use a reminder to stay on top of their org’s security. Whether you are setting up a brand new org or updating the security settings in your existing org, the security and sharing options within Salesforce can be a bit daunting. I thought it worth a blog post to share a few tips that I have found valuable, from my past experience (or more accurately, my past mistakes).

Default Sharing Settings – Setup | Security Controls | Sharing Settings

This is usually a good starting point. Here you can set default object access for both internal and external users. This is also where you can specify whether or not to grant access to objects through the role hierarchy.

If there are some objects that will never be restricted, you can set the default to Public Read/Write or Public Read Only. A common misconception is that this means that everyone can view those objects. Not so! These settings are for general record visibility, and you set object access in profiles. For instance, you can set the Case default to Public Read/Write. Then you can give the Sales profile “Read” access on the Case object, and the Support profile “Read/Edit/Create” access on the Case object. Users with the Sales profile will be able to view all cases (regardless of ownership) but not edit them. Users with the Support profile will be able to view all cases (also regardless of ownership) and edit them.

Objects set to Private will be visible only to the owner of each record unless you check the “Grant Access Using Hierarchies” box, which will make them also visible to users above the record owner, all the way up through the role hierarchy. When in doubt, set an object to Private, and then add hierarchy access and sharing rules – I have found from past experience that it is far easier to change a default to Public than it is to change it to Private!

Sharing Rules

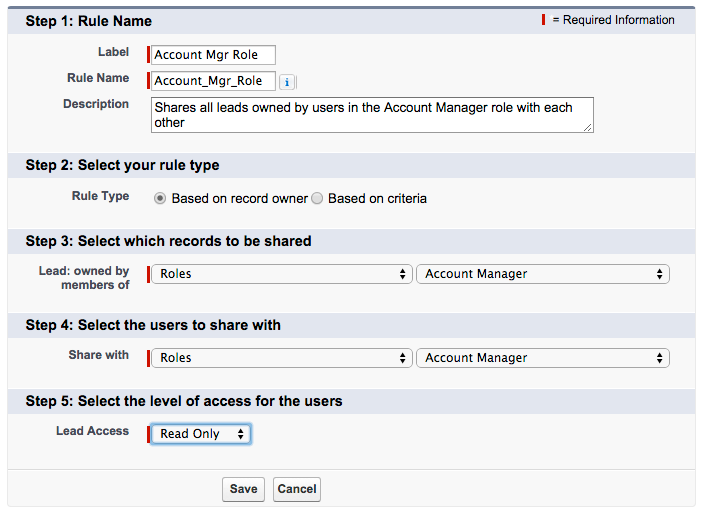
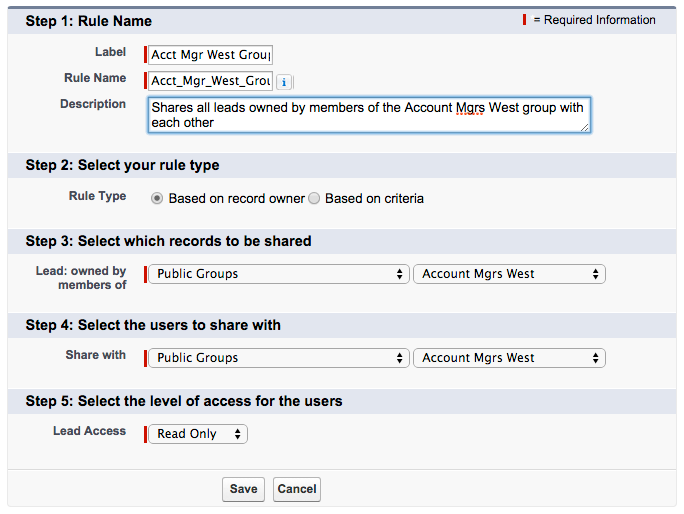
Below the default sharing settings, you can set more granular sharing rules for each object, with the exception of child objects whose sharing settings are controlled by the parent. For instance, I have one group of users who need to see each other’s leads – but they are all in the same role. With leads set to Private, they cannot see each other’s leads. This could be solved with either of these two owner-based sharing rules:

1) A sharing rule allowing everyone in that role to view all leads owned by others in their role (this option is fine if everyone in that role needs access)

2) A sharing rule allowing everyone in a public group to view all leads owned by others in that group (this option is what you want if you are not sharing with every user who has that role)

Important to remember when using owner-based sharing rules: if you share with “Role and Subordinates,” that means everyone on down the hierarchy from the role you specify. Be careful when choosing that option!

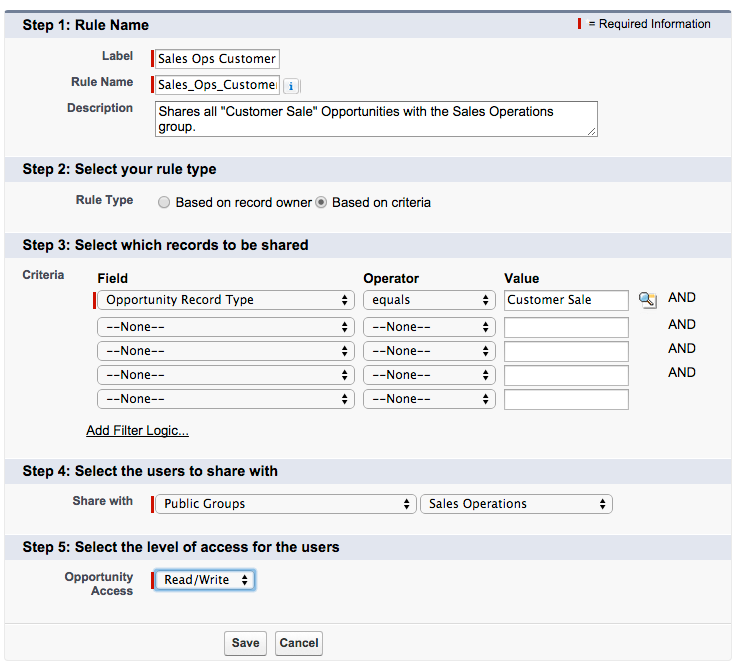
Another common use of sharing rules is the criteria-based sharing rule. This kind of rule is useful if you are sharing records not based on ownership, but on specific criteria, such as record type:

Roles – Setup | Manage Users | Roles

The role hierarchy is all about access to other people’s records – especially useful if you have a manager who needs to see what their team is doing, but the team should not see each other’s records. The role hierarchy is also where you can lock down records that should not be shared across different departments. I usually set up a role hierarchy that is similar to the company’s org chart. At the very top, I have the “Administrator” role for myself – this is not necessary for my access (because the System Admin has view/modify all data), but if I create records or test data that other users do not need to see, those records will not be visible if the objects are private. If you find that your company has an overabundance of layers of management, you may want to combine some roles for simplicity (there are some useful examples in my previous blog post on security).

Something you may not know: roles are not required! If you are customizing the security for a very small company, or if most of your objects will have Public sharing defaults, it’s okay to not set up a role hierarchy at all.

Profiles – Setup | Manage Users | Profiles

Profiles allow access to objects and fields. If most of your users can have the same level of access to most objects, then you can get away with a lower number of profiles. What I like to do is make a list of departments and a list of objects, and decide which objects each department needs to be able to Read/Edit/Create. For instance, I allow most CXOs/VPs “view all” on all objects – so I create one “Executive” profile for them regardless of where they are in the company (Sales, Marketing, Finance, HR, etc.). Sales and Marketing both need access to leads and accounts, but if you wanted to restrict campaign access to only the Marketing users, they should have a separate profile.

Profiles – unlike roles – should generally not line up with your org chart. Most companies with less than 1000 employees should only need 5 to 10 custom profiles. (Is that the sound of your jaw hitting the floor? I thought so.) If you find you are in need of profile cleanup, check out the amazing, timesaving PermComparator app. It will compare profiles, users, or permission sets – I use it for cleanup, and also to troubleshoot record access when one user can view something and another cannot. The only thing it does not do is compare profile field-level security. Speaking of field-level security – the fewer profiles you have, the fewer profiles you need to think about every time you create a new field and have to go down that profile list to determine access!

Use extreme caution when allowing Delete, View All, or (god forbid) Modify All access to an object. For many objects, I don’t allow users to delete records because it’s too easy to delete things by accident. The flip side of that is that I have to merge all duplicate records myself, because “Delete” is needed for merging. View All and Modify All are profile settings which will override your default settings and the role hierarchy. If you forget that little tidbit, it may come back to bite you in the, um, access.

The System Administrator profile basically grants a user ultimate power. If, like me, you are lucky enough to have a manager who also possesses admin skills and is the backup when you are out of the office, you may want to share that profile with your manager. Other than that – and I cannot emphasize this enough – no one else should have the System Administrator profile. When too many users have unlimited permissions, your org can quickly turn into the Wild West.

Permission Sets – Setup | Manage Users | Permission Sets

Permission sets are still one of my favorite features that Salesforce has ever released. You can create permission sets to allow access to nearly everything that exists in profile settings. If you are dealing with users who should have almost the exact same permissions except for a few fields or record types, you can give them the same profile, and create a permission set for the few users who need additional access. Permission sets are assigned to individual users, so they can be used in two ways: 1) exception-to-the-rule situations, where you just want a few people to have access to some extra fields or one object, or 2) large sets of permissions, where you assign the permission set to an entire department instead of creating another profile.

Manual Sharing

Last but not least, thank goodness for manual sharing! Do not try to build overly complex security settings for random, one-off exceptions. Instead, train your users to use the “Sharing” button (at the top of most records if you’ve put it on the page layout).

When a user clicks the Sharing button, they are taken to a screen that shows who has access to that particular record. The Expand List button will display every user with access (which can be helpful if you have roles and groups listed and are not sure who is in them).

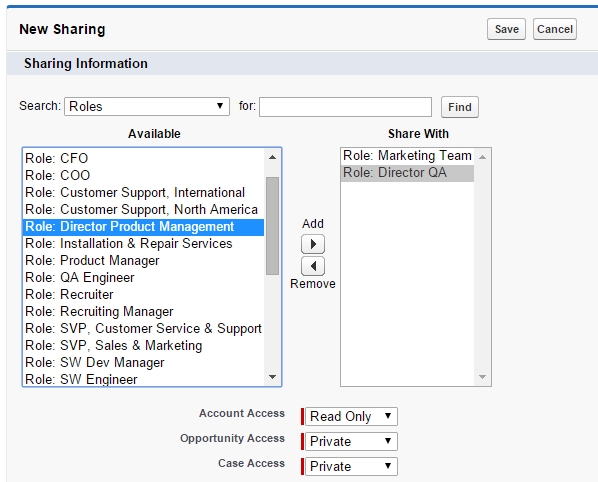
After clicking the Add button, there is a page that will allow the user to share the record with other individual users, public groups, roles, or roles and their subordinates, and determine whether they have Read Only or Read/Write access. For account sharing, you can also set the access of that account’s cases and opportunities.

I hope this helps make security a little less mysterious. Please feel free to comment with additional tips, or questions. And remember… when in doubt, lock it down!