Both experienced and newbie admins can always use a reminder to stay on top of their org’s security. Whether you are setting up a brand new org or updating the security settings in your existing org, the security and sharing options within Salesforce can be a bit daunting. I thought it worth a blog post to share a few tips that I have found valuable, from my past experience (or more accurately, my past mistakes).
Default Sharing Settings – Setup | Security Controls | Sharing Settings
This is usually a good starting point. Here you can set default object access for both internal and external users. This is also where you can specify whether or not to grant access to objects through the role hierarchy.
If there are some objects that will never be restricted, you can set the default to Public Read/Write or Public Read Only. A common misconception is that this means that everyone can view those objects. Not so! These settings are for general record visibility, and you set object access in profiles. For instance, you can set the Case default to Public Read/Write. Then you can give the Sales profile “Read” access on the Case object, and the Support profile “Read/Edit/Create” access on the Case object. Users with the Sales profile will be able to view all cases (regardless of ownership) but not edit them. Users with the Support profile will be able to view all cases (also regardless of ownership) and edit them.
Objects set to Private will be visible only to the owner of each record unless you check the “Grant Access Using Hierarchies” box, which will make them also visible to users above the record owner, all the way up through the role hierarchy. When in doubt, set an object to Private, and then add hierarchy access and sharing rules – I have found from past experience that it is far easier to change a default to Public than it is to change it to Private!
Sharing Rules
Below the default sharing settings, you can set more granular sharing rules for each object, with the exception of child objects whose sharing settings are controlled by the parent. For instance, I have one group of users who need to see each other’s leads – but they are all in the same role. With leads set to Private, they cannot see each other’s leads. This could be solved with either of these two owner-based sharing rules:
1) A sharing rule allowing everyone in that role to view all leads owned by others in their role (this option is fine if everyone in that role needs access)
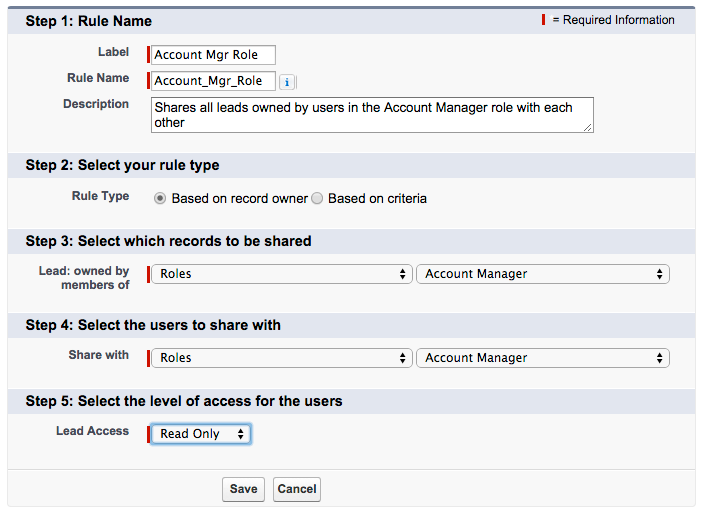
2) A sharing rule allowing everyone in a public group to view all leads owned by others in that group (this option is what you want if you are not sharing with every user who has that role)
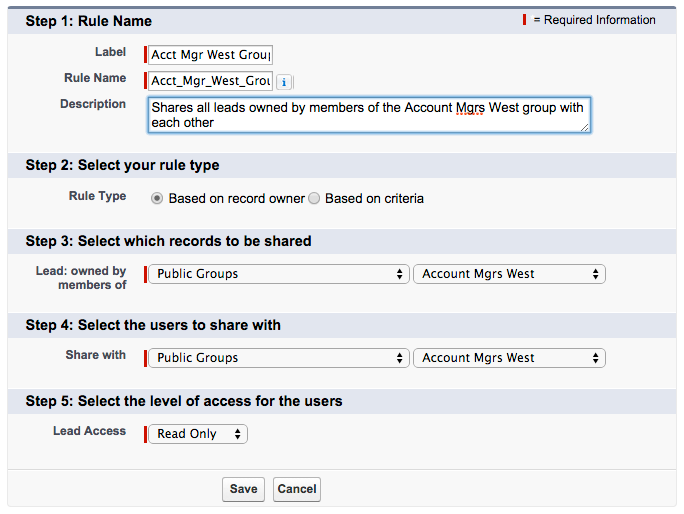
Important to remember when using owner-based sharing rules: if you share with “Role and Subordinates,” that means everyone on down the hierarchy from the role you specify. Be careful when choosing that option!
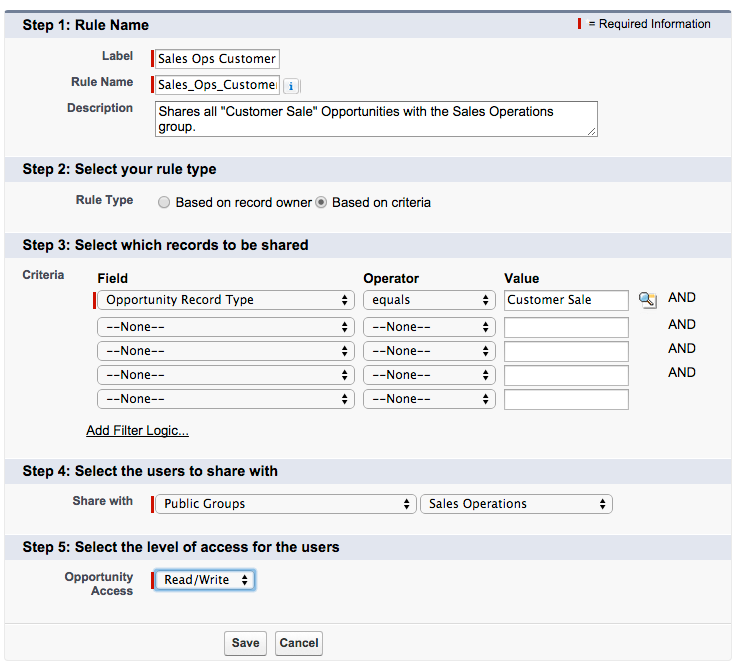
Another common use of sharing rules is the criteria-based sharing rule. This kind of rule is useful if you are sharing records not based on ownership, but on specific criteria, such as record type:
Roles – Setup | Manage Users | Roles
The role hierarchy is all about access to other people’s records – especially useful if you have a manager who needs to see what their team is doing, but the team should not see each other’s records. The role hierarchy is also where you can lock down records that should not be shared across different departments. I usually set up a role hierarchy that is similar to the company’s org chart. At the very top, I have the “Administrator” role for myself – this is not necessary for my access (because the System Admin has view/modify all data), but if I create records or test data that other users do not need to see, those records will not be visible if the objects are private. If you find that your company has an overabundance of layers of management, you may want to combine some roles for simplicity (there are some useful examples in my previous blog post on security).
Something you may not know: roles are not required! If you are customizing the security for a very small company, or if most of your objects will have Public sharing defaults, it’s okay to not set up a role hierarchy at all.
Profiles – Setup | Manage Users | Profiles
Profiles allow access to objects and fields. If most of your users can have the same level of access to most objects, then you can get away with a lower number of profiles. What I like to do is make a list of departments and a list of objects, and decide which objects each department needs to be able to Read/Edit/Create. For instance, I allow most CXOs/VPs “view all” on all objects – so I create one “Executive” profile for them regardless of where they are in the company (Sales, Marketing, Finance, HR, etc.). Sales and Marketing both need access to leads and accounts, but if you wanted to restrict campaign access to only the Marketing users, they should have a separate profile.
Profiles – unlike roles – should generally not line up with your org chart. Most companies with less than 1000 employees should only need 5 to 10 custom profiles. (Is that the sound of your jaw hitting the floor? I thought so.) If you find you are in need of profile cleanup, check out the amazing, timesaving PermComparator app. It will compare profiles, users, or permission sets – I use it for cleanup, and also to troubleshoot record access when one user can view something and another cannot. The only thing it does not do is compare profile field-level security. Speaking of field-level security – the fewer profiles you have, the fewer profiles you need to think about every time you create a new field and have to go down that profile list to determine access!
Use extreme caution when allowing Delete, View All, or (god forbid) Modify All access to an object. For many objects, I don’t allow users to delete records because it’s too easy to delete things by accident. The flip side of that is that I have to merge all duplicate records myself, because “Delete” is needed for merging. View All and Modify All are profile settings which will override your default settings and the role hierarchy. If you forget that little tidbit, it may come back to bite you in the, um, access.
The System Administrator profile basically grants a user ultimate power. If, like me, you are lucky enough to have a manager who also possesses admin skills and is the backup when you are out of the office, you may want to share that profile with your manager. Other than that – and I cannot emphasize this enough – no one else should have the System Administrator profile. When too many users have unlimited permissions, your org can quickly turn into the Wild West.
Permission Sets – Setup | Manage Users | Permission Sets
Permission sets are still one of my favorite features that Salesforce has ever released. You can create permission sets to allow access to nearly everything that exists in profile settings. If you are dealing with users who should have almost the exact same permissions except for a few fields or record types, you can give them the same profile, and create a permission set for the few users who need additional access. Permission sets are assigned to individual users, so they can be used in two ways: 1) exception-to-the-rule situations, where you just want a few people to have access to some extra fields or one object, or 2) large sets of permissions, where you assign the permission set to an entire department instead of creating another profile.
Manual Sharing
Last but not least, thank goodness for manual sharing! Do not try to build overly complex security settings for random, one-off exceptions. Instead, train your users to use the “Sharing” button (at the top of most records if you’ve put it on the page layout).
When a user clicks the Sharing button, they are taken to a screen that shows who has access to that particular record. The Expand List button will display every user with access (which can be helpful if you have roles and groups listed and are not sure who is in them).
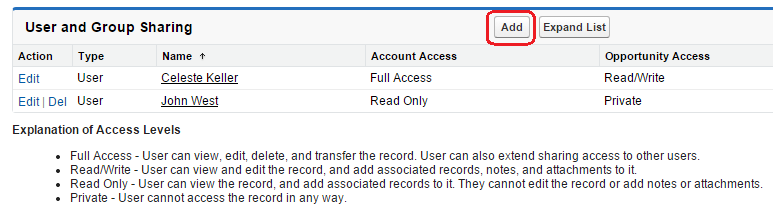
After clicking the Add button, there is a page that will allow the user to share the record with other individual users, public groups, roles, or roles and their subordinates, and determine whether they have Read Only or Read/Write access. For account sharing, you can also set the access of that account’s cases and opportunities.

I hope this helps make security a little less mysterious. Please feel free to comment with additional tips, or questions. And remember… when in doubt, lock it down!

Liked this post? Follow this blog to get more.
