Prep for the New Year with Metadata Cleanup

Is it December already?? I’ve been saying all year that I was going to do a massive org metadata cleanup… whoops. Well, I can still get quite a bit done – and better late than never!

There is a lot of emphasis on data cleanup, but metadata cleanup is just as important! Too much metadata clutter can slow down the firing of workflow rules and Apex code, cause you to hit limits, and in general just make it hard for you to create and manage configuration. Here are some of my favorite tricks to quickly clean up metadata clutter.

1. Clean up Reports that are no longer used. This is always on my cleanup list, because it is an ongoing issue! To find the Last Run date of all your reports, simply create a new report using the standard report type “Reports,” add filters to look for never-run or run more than X months/years ago, and sort by Run Date. Easy, right? Sure, if you don’t want the ID.

If you do want the ID – or the Unique Name, or who created the report – all you have to do is to create a new Custom Report Type. Just use the “Reports” object – you don’t need anything else – and save it.

Run a report using that report type – and all of a sudden, you have those additional values to pull into your report… I don’t know why, so don’t ask. Let’s just call it one of the charming quirks of Salesforce reporting.

Warning: if you also plan on deleting folders, first move the reports to a folder that you are not deleting, and then delete the reports. Otherwise, you will not be able to delete the folder that contained the deleted reports without deleting them from the Recycle Bin.

2. Clean up Dashboards that are no longer used. Finding out when a dashboard was last viewed is not as easy as it is with a report. For this, I like to use Workbench. You’ll want to log in with your Salesforce credentials, and then select SOQL Query for the Dashboard object.

In the query screen, make sure to at least pull in the Title and the LastViewedDate. I like to sort by LastViewedDate (nulls first) so I can see which dashboards were last viewed the longest ago, or never.

Click query, and you will get your list of dashboards!

A word of warning on deleting dashboards: it’s not as simple as reports. You will want to follow these steps:

  • Delete the components from the dashboard. (If you do not remove the components, you will not be able to delete the related reports while the dashboard is in your Recycle Bin.)
  • Save the dashboard once it is empty.
  • Move the dashboard to a folder that you will not be deleting. (You cannot delete a folder while its dashboards are in your Recycle Bin.)
  • Delete the dashboard.

3. Clean up Report and Dashboard Folders that are no longer used. I will repeat my warning from earlier: if you want to delete report or dashboard folders, emptying them is not enough – you can delete everything in a folder, but when you try to delete the “empty” folder, you’ll get this error:

Everything that was in those folders must no longer be in the Recycle Bin – simply deleting them is not enough. The logic behind this restriction is, if you go to your Recycle Bin and undelete a report, it will be put back into the same folder. If that folder has been deleted, then the undeleted report will have nowhere to go.

To get around this, move reports that you wish to delete to the My Personal Custom Reports folder first – because that folder will be there forever – and then delete the reports. For dashboards, move them to My Personal Dashboards before deleting. (Any other folder will do, so long as you know you do not plan to delete it.)

4. Find out if you are wasting User licenses. There are two things I look for when I want to free up some licenses:

First: Go to Setup | Manage User | Users. There should already be a standard list view called Active Users. Sort that list view by Last Login, and you’ll have something like this:

This is a great reminder that I need to deactivate ex-employees, as well as an interesting look at whether people are logging in or not (which can enable me to start conversations, if necessary, about who needs a license and who doesn’t).

Second: What if I’ve frozen some users and don’t remember which ones they are? This is not accessible in a Users report, but you can create a new list view to find out which users have been frozen. Just specify “Is Frozen = true” – and I also like to add “Active = true” because I am usually looking for active users who have been frozen.

Note: if you use the SalesforceA app, you can easily access a list of frozen users within the app!

5. Clean up Profiles with no users. This is not difficult, but it is a three-step process:

Step 1: Run a report of active users, summarize by Profile, hide details, and you will have a list of all profiles assigned to active users.

Step 2: Look at the list of your profiles in Setup | Manage Users | Profiles – how many are there?

Step 3: Go into each profile that did not show up on your report. If it contains inactive users and you do not think you will need that profile again, assign a different profile to the users, then delete the profile. Note: Salesforce will not let you delete a profile that contains any users, even inactive ones.

You can repeat this for Roles, but be careful here: unlike profiles, roles are connected to one another in the Role Hierarchy. Make sure that you are not deleting a role that is a key part of your hierarchy.

6. Clean up duplicate/similar Profiles. This seems to happen in every org I’ve ever seen! A couple of years ago, I discovered the PermComparator app, and it changed my life. Here is how it works:

Log in here with your Salesforce credentials, and click “allow” on the next screen to allow access. You then have your choice of three metadata components to compare: Users, Permission Sets, or Profiles – or any combination thereof.

Then you can drag & drop what you want to compare! In this example, I am comparing two profiles:

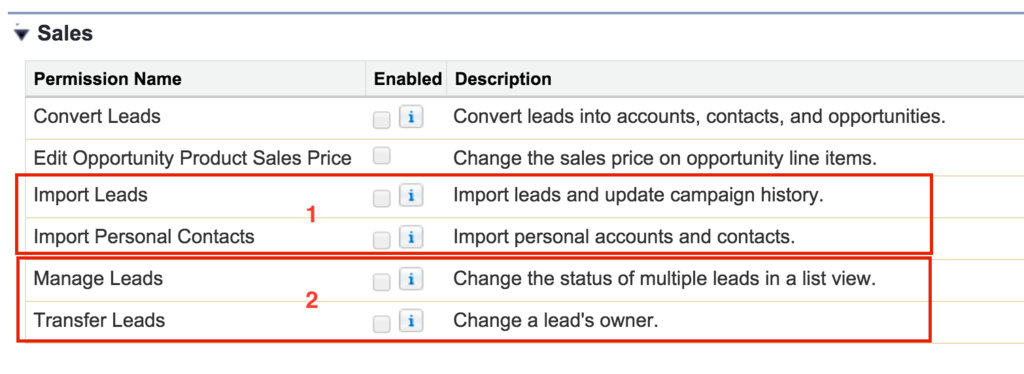
For cleanup of profiles or permission sets, I like to look at the “Differing Perms” section. It is broken out into User Permissions (from App Permissions, System Permissions, etc.), Object Permissions, and Setup Entity Permissions (things like apps, Visualforce pages, Apex code, etc.). Unfortunately, it does not compare field-level permissions.

Once I’ve seen all of the differences, I can combine profiles with similar (or the same) permissions into one profile, put the users from those profiles into the one I want to keep, and delete the extra one.

7. Clean up unused fields. There’s an app for that! One of the most-loved, best-reviewed apps on the AppExchange is Field Trip, which will analyze your fields and how often they are used.

Install Field Trip as you would any app. Once installed, go to the Field Trip tab and click New Field Trip.

  1. Give your Field Trip a name.
  2. Select the object which you would like analyzed.
  3. Save (the click the Analyze button on the new field trip), or click Save and Analyze.

Once analyzed, a related list will appear on the field trip:

You can go into the list and sort by Populated On (the exact number of records on which each field is populated) or by Populated on % (the percentage of records on which each field is populated), to see which fields are being used the least.

Field Trip can be used on all standard or custom objects in your org. It also comes with a couple of sample reports, and you can create more reports on all of your field trips for deeper analysis.

It’s a good idea to be careful when deleting fields – this is my process:

  • Change the field name so I know it’s flagged for deletion. (I like to add “zzz” to the beginning of the name so that when I look at an object’s fields, those fields are down at the bottom of the list.)
  • Change the field-level security so that users can no longer see the field. (Make sure to leave it this way for a while – your users will most likely alert you if they notice the missing field.)
  • Set a task – I do this for 90 days out – for yourself to clean up those fields.
  • Export any existing data from the fields that you intend to delete, along with the record IDs – this way if anyone freaks out, you can quickly re-create the field and replace the data.
  • Delete the field(s).

8. Clean Up Page Layouts and Record Types. This is the last step in my cleanup – the main reason being, I will have less page layout assignments and record type defaults to worry about if my profiles have already been cleaned up.

There isn’t a really easy trick for this kind of cleanup – but here’s how I do it. First, I look at my page layout assignments:

Then, I look at the page layout list to find layouts that aren’t assigned to anyone:

While it’s a no-brainer to simply delete unused layouts, I like to take a look at them before deleting, to see how they are different from the current layouts, which might give me ideas for optimizing those layouts.

Cleaning up record types is less simple. I like to do it by creating a report, summarized by Record Type and Created Date. (Group the Created Date by month or year if that makes it simpler.)

In this example, I have one record type that has not been used since 2011 – this looks like a perfect candidate for cleanup! But again, let’s not be hasty. Consider the following before deleting a record type:

  • Does that record type have its own page layout, and if so, how is it different?
  • Do you have validation rules or workflow rules or Apex code that is looking for/updating to that record type?
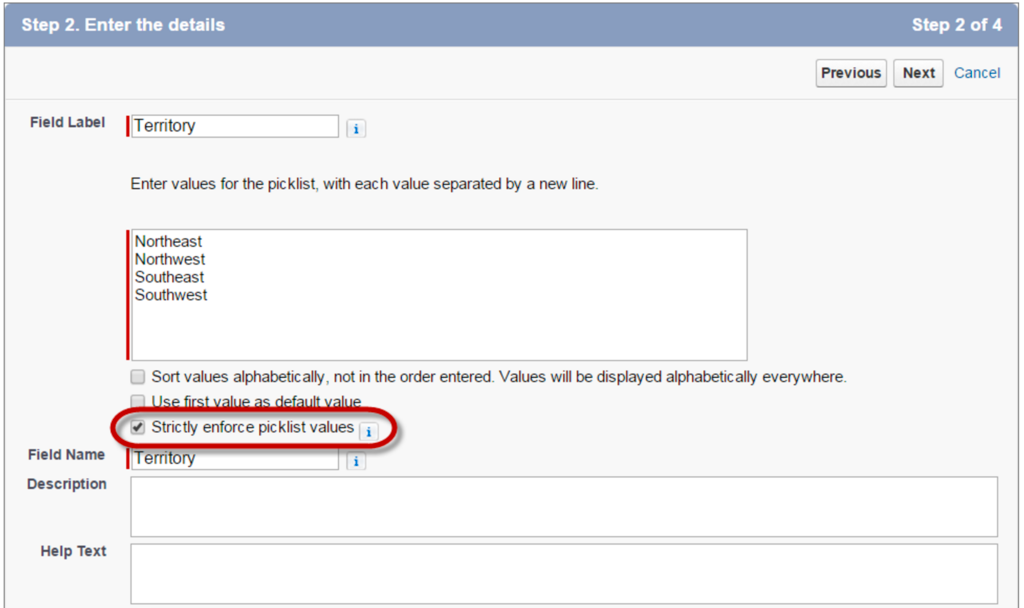
  • Do you have picklist values that are unique to that record type?
  • Do any of your profiles have that record type as their default?
  • Is there another record type that makes sense to assign to those records?

Then – again, before deleting the record type entirely – I like to simply deactivate it and let it sit for a while to make sure that it doesn’t cause issues for anyone.

I hope this info has been helpful. Happy holidays, and happy New Year cleaning!!

Process Builder + Lookup Fields = Magic

For me, the Process Builder was kind of like finding a magic unicorn.

Seriously, think about it – it does so many things that we could previously only accomplish with Apex code. It also takes workflow functionality to a whole ‘nother level! This example of Workflow Rule vs. Process Builder is my favorite…

The request: “We have this field on the Account, that tells us which Account Manager should be assigned to a specific customer. We need you to automate assigning an Account Manager based on where the account is located/how much they’ve spent/support level/whatever criteria.”

My response: “Yes! A workflow rule! No problem.”

Sound familiar? (I know I’m not the only one who has walked right into that one!) I went to create my workflow rule, and found that, in a field update to a lookup field, you are only able to assign one value to that field. This meant that I had to have a separate workflow rule for every Account Manager.

So… I built out all of those workflow rules. And I’ve done this more than once, for different lookup field requirements. One time, I actually created fourteen workflow rules – each with a different field update – for one lookup field. This is a perfect example of how, as admins, we sometimes create system clutter because we need a workaround. Only we admins can see it – but it’s still clutter! (I won’t even go into what a mess I made when Account Managers began switching territories, leaving the company, etc…)

And then one day, the perfect solution appeared like a magic unicorn – the Lightning Process Builder! When it was first rolled out, it promised a lot – and I just couldn’t wait to experiment with it. One of the things it promised to do was to give us the ability to consolidate multiple workflow rules into one Process – so naturally, that’s where I went first.

Process Builder has many similarities to Workflow Rules. Just like a workflow rule, it begins with an object. And just like a workflow rule, we can specify whether the Process runs only when a record is created, or when it is created/edited.

Then – also like a workflow rule – we can set criteria, and add field updates based on those criteria. But – and this is where Process Builder goes beyond workflows and gets magical – we can keep adding different criteria nodes, and have a unique field update for each one of them. Bonus: it will go through the criteria nodes in order – if the record does not meet criteria #1, it moves to criteria #2, and so on. This is great if you want to have a final criteria node to assign a default field value to records which meet none of your criteria.

Isn’t that pretty? If you aren’t yet familiar with Process Builder, here is how this works under the hood:

There are basically three things you need to do in a Criteria Node:

  • Name it.
  • Set your conditions (or use a formula if you prefer) – you can also add AND/OR logic just like a workflow rule.
  • Determine whether you want the Process to fire only when the record is edited to meet the conditions, or every time the record is edited (and it happens to meet the conditions).

Then you can add an “Immediate Action” – for a field update, select the Update Records option.

An Action has several things to specify as well:

  • Name it.
  • Select what to update – here you are given the option to update the record which started the Process, or to update records related to that record.
  • Optional: add more conditions that determine whether or not to make this update – very cool if you want to add several actions within the one criteria node, but say, one of the actions should only make updates if a certain field is null, etc.
  • Add your field updates!

Fun bonus: When setting the lookup field value, you can specify the one value (using the ID, as I did in the above example), or you can reference and copy a value from a field on a related record! For example – if I have an Account Manager on the Parent Account, I might want to copy that Account Manager to the Child Account. To reference a field instead of setting an ID, change the Type from ID to Reference:

Then, click into the Value box and a new window will open. Select Parent Account ID to access fields in your account’s parent, and then select Account Manager as the field value to copy.

Now it looks like this (hover over the Value to view the full field name):

Voila! Now that’s magic.

This is only one use case for the Process Builder – but the possibilities are endless! Do you have multiple workflow rules that you want to combine? Do you want to do more than just send an email or update a field? Well, now you’ve got a magic unicorn that can help you. If you’re not sure where to start, try this Trailhead module, and have fun with it!

Salesforce Administration: Where Do I Start?

Eight years ago, Salesforce was – to put it mildly – less of a thing. Know what I mean? Salesforce admins were just folks in operations, or marketing, or sales support, or other random positions where managing the Salesforce org was an additional job duty. We wore many hats – and “Salesforce Admin” was not a common title, and certainly not a career. When I attended my first Dreamforce in 2008, there were around 10,000 attendees. I had no idea that it would become a solid career that would (most likely) take me all the way to retirement.

But over the years, Salesforce – and Dreamforce – grew exponentially. I get asked on a regular basis – by friends, acquaintances, co-workers, blog followers, Twitter followers, etc. – “How did you become a Salesforce admin?” or “I’m considering a career change to Salesforce administration, where do I start?” While the first steps in that direction may vary for each newbie/potential admin, I’d like to share a list that I think is a good starting point.

1. Sign up for your own developer org. Don’t be intimidated by the word “developer” – it’s also been referred to as an “admin playground,” and basically it’s your own private Salesforce org, where you can learn things and break things and do whatever you want.

2. Get into Trailhead! Trailhead is a great way to learn Salesforce basics, and then to move on to more advanced configuration, including development. Sign in with your new developer org credentials, and start on the Admin Beginner trail. This is a new training feature that Salesforce has put a ton of work into, and it’s a lot more fun than just reading through the Help & Training documentation. I’m still working my way through the admin trails. And it’s got badges!

3. Participate in the Success Community. This is the best place to ask questions – and remember, there are no dumb questions – and connect with other Salesforce admins and users! Also use your developer org credentials to log in here. Note: if you are already signed into your job’s Salesforce org, that’s the account that you will log into the community with. That’s fine until you change jobs and lose everything you bookmarked & followed & voted on… so I always recommend that you log into the Community with your developer org credentials. I even wrote a blog post on the community that goes into more detail on getting the most out of it!

4. Get a book! Hey, I’m old school – I love having a paper book on hand to reference while I’m learning. Here’s a fairly recent one that is great for beginners.

5. NEVER STOP LEARNING. Experiment! Pretend that you are a business, go into your developer org, and start creating Accounts, Contacts, etc. Figure out how to add a logo and customize your home page. Then start asking yourself, “how can I make Salesforce more useful for my business?” You might find that the page layouts are not to your liking. Guess what? You can change that. As a Salesforce administrator, you can turn it into whatever you want – it just takes time and practice. If you really enjoy the process of customizing and configuring your Salesforce org, that’s a sign that you will enjoy working as an admin!

6. Once you’ve got some practice under your belt, look into certification. Salesforce makes certification so easy! The study guide tells you exactly what you need to know – and if you’re still extremely new to it, you can take a week-long class that will have you ready for the certification exam. Hint: the class can be spendy, and your company might not be willing to cough up the $$$ to send you to it – so here’s how I passed my first exam (and all the ones that followed!) with nothing but studying.

These are just some guidelines to get you started, and there is an endless supply of info out there (especially if you visit my best friend, Google). Have fun with it, explore as much as you can, and if you find yourself enjoying it and geeking out about what you learn, you are already on your way to becoming an awesome admin!

Winter ’16: These are a Few of My Favorite Things

With all of the hubbub about the new Lightning Experience, it’s easy to overlook the fact that there are many other new features for admins in the Winter ‘16 release. After evaluating Lightning and deciding that it was not fully baked enough for my org to use at this time (more on that in my next post), my honest reaction was “The biggest thing Salesforce has released in years, and I can’t even use it yet? Boo!”

But then I read the release notes. And that’s how I discovered that there is so much more. So… here are a few of my favorite things.

Picklist pilots! Not one, but TWO! I can’t decide which one I’m more excited about. (You will need to Contact Salesforce to participate in these pilots.)

Restricted picklists: Ever had thousands of records mass uploaded or updated with a misspelled picklist value? Ever wish that there was a way to enforce picklist values everywhere, even when records are modified through the API? This can prevent that from happening!

Global picklist values: This is quite brilliant! The way it works is simple. You can create a “Global Picklist” and assign values, and then create a new field on an object and indicate that you’d like that field to only use the global picklist values. It saves so much time re-creating or updating picklist values on multiple objects (and removes the element of human error from that process).

Auto-activate a refreshed sandbox! Here is why this is one of my new favorite features:

Me (Friday afternoon): “I’ll refresh the sandbox over the weekend.”

My boss (Monday morning): “All right team, the sandbox was refreshed over the weekend and is ready to go.”

Me (Monday morning): “Oh wait… I forgot to activate it… my bad… I’ll let you know when it’s ready…”

Process Builder is bulkified! If you’ve built processes and had them fail due to SOQL query limits, then you’ll love this update as much as I do. A huge thank you to the dev team at Salesforce for making this idea happen sooner rather than later!

Rich text available in Chatter posts! Need I say more?? My sales users are going to love this.

Increased Partner Profile permissions! In Partner profiles, under App Permissions, there are new permissions that you can add for your partner users.

  1. Allow partners to import accounts, contacts, and leads
  2. Allow partners to mass update lead owner/status in a list view

Custom Lookup Fields on the Activity object! This is awesome. Now you can create additional lookup fields on an activity/task to an object of your choice, complete with lookup filters. Make sure to check out these limitations in the release notes before you go hog wild.

You can decide which tests to run when deploying change sets! This is incredibly helpful. Here are the details:

  • Default – Keeps the default behavior for all tests. In sandbox, no tests are executed. In production, all local tests are executed if your change sets contain Apex classes or triggers. Local tests are all tests, except the ones that originate from managed packages. If your package doesn’t contain Apex components, no tests are run.
  • Run Local Tests – All tests in your organization are run, except the ones that originate from installed managed packages. This test level is the default for production deployments that include Apex classes or triggers.
  • Run All Tests – All tests in your organization are run, including tests of managed packages.
  • Run Specified Tests – Only the tests that you specify are run. Provide the names of test classes in a comma-separated list.

These are just the things that I found most useful personally, in my company’s org. You may find other features more useful – so be sure to look at the complete release notes to take full advantage of all that is new and improved. One of my favorite blogs, Admin Hero, has a great new post that goes into more detail on additional enhancements, including those found in Service Cloud and Salesforce1. Happy Winter ‘16!