Like many SFDC admins, I sometimes find my great ideas thwarted by the limits of workflow rules. There are certain things that just can’t be done via workflow. My most frequent complaint: “a trigger could get it done, but I can’t write code!” Well okay, I can understand some of the code that I see – but I’m not fluent enough in Apex to write my own code from scratch.
Then a fellow SFDC admin showed me how to create triggers without writing code. It’s actually so simple, I’m amazed I never thought of it. Here’s how to do it…
1. Find an unmanaged AppExchange app that does something similar to what you want to do. For example, let’s say I want to update a field on an opportunity when certain products are added. There is an app called Opportunity Contact Roles Validation which, according to its description, creates two custom fields and uses an Apex trigger to update those fields. Note: it’s crucial that you use an unmanaged app, so that you can access the code. You can find out whether or not the app is unmanaged by checking the Details tab.

2. Install the app to your sandbox. The reason you install it into your sandbox is so that you can get to the code. If you install it in your production instance, the code is not accessible.
3. Locate the trigger that the app uses to update fields. Right after installation, go to Setup | App Setup | Develop | Apex Triggers – if you can sort by modified date, it will be easy to find.
4. Copy the code from the trigger. Make sure to click Edit first, so that you do not copy the line numbers as well.
5. Paste that code into a new trigger. Go to Setup | App Setup | Customize | Opportunities (or whatever the object is that you are using the trigger for) | Triggers – and click the New button. Paste the copied code into your new trigger.
6. Edit the code. This will actually take a little bit of brain power – get some coffee first. What you need to do is, look for any part of the code that is referring to a field update. In this example, we changed “OpportunityContactRole.OpportunityId” to “OpportunityLineItem.pricebookentry.product2.Require_Customization_Info__c” – see the code snippets below. We are referring to a custom field called “Require Customization Info” on the Product in order to update a field on the opportunity (which you can’t do in a workflow). Once you have modified the code, save your trigger.
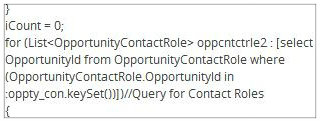
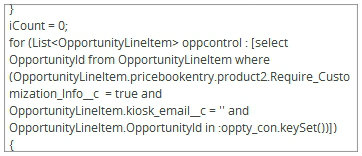
Check out the Before and After versions of the trigger for the full code edits.
7. Install the original app that your trigger is based on into your production instance of SFDC. You may be wondering, “why do that when I only want my edited trigger?” This is the part that saves time and avoids writing test code. The app will have unit test coverage written into it, and you need this. (And trust me, you do not want to write it yourself!)
8. Use a change set to move your custom trigger from your sandbox to production. Change sets are one of my favorite tools. If you have not used them before, check out this overview for the basics. You will want to create an outbound change set in your sandbox that includes your trigger, then deploy it to production. Once that’s done, deploy the inbound change set in your production instance, and your trigger will be operational. You’re done!
All of the credit for this idea goes to Jake Harris. Jake has two great apps on the AppExchange – PowerClone (to make unlimited copies of any record, plus its related records!) and Excelist(to export list views or tagged objects into Excel) – and he is a brilliant and creative SFDC guru. Thanks Jake!
Liked this post? Follow this blog to get more.
