The funny thing about Custom Report Types…

Custom report types are one of the best features that Salesforce has to offer. However, I recently drove myself crazy because custom report types have this one little quirk that can ruin your entire day. It’s such a small thing – but if you don’t know about it, you can become very frustrated when you attempt a report using one of your custom report types.

This is the quirk: you may not be able to see or use all of an object’s custom fields on your report. What makes it worse is, you will not notice the issue right away. (I realize that this makes no sense at all, just bear with me…) When you create your custom report type, it will automatically make all of the fields in each object available for reporting – they will show up in the report builder and you can use them for criteria, etc. However, custom fields added to an object after a custom report type is created for that object will not be available when you use that report type – you must add them manually.

Last year I created a custom report type, and created a few reports with it at that time. Everything worked fine… and sometime between then and now, we added several custom fields to opportunities… and then recently, my boss tried to create a report of the same type, and asked me, “Why isn’t this particular field in the report builder when all of our other custom opportunity fields are there?” I had no answer for that. After struggling with it all afternoon, I was forced to admit defeat and file a support ticket. Of course, Salesforce support knew the answer – the field we wanted had been added to the opportunity object after the report type was created, so it was unavailable until manually added to the report type layout.

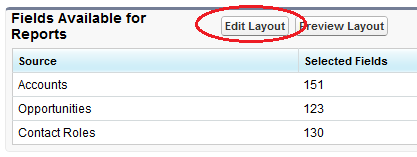
So… allow me to save you that aggravation! This is so easy, it’s just silly. Go to your custom report type, scroll down, and you will see this:

Just click “Edit Layout” and you will be able to drag and drop the fields that you want into each object in the report type layout. This is also useful if you want to remove certain fields from a report type – just make sure they aren’t fields that someone will be looking for later!

Getting the most out of Dreamforce

Dreamforce 2012 is next month! As I was planning my trip – this will be my fifth Dreamforce conference – I remembered how overwhelming it was the first time I attended. Every year there is a huge increase in attendance, and it is getting more and more difficult for newbies to enjoy the experience and get what they want out of it (or even know what they want to get out of it). You could just show up and play it by ear, but if you think about what you want to learn and plan accordingly, you will leave with far more knowledge and inspiration. For those who are new to Dreamforce, or who have attended in the past but didn’t get much out of it, I’d like to share some helpful advice.

Register for as many breakout sessions as possible, as soon as they are posted online. This is more important now than it was several years ago, because many sessions will fill up almost immediately. As soon as you receive an email telling you that the sessions are available on the Dreamforce website, sign up for as many as possible. There won’t be a ton of them at first, so you will want to check back every week for new sessions and rearrange your conference calendar accordingly. Also, look for sessions whose names start with “Hands On” – these are really useful because you get to walk through actual exercises instead of just watching a demo.

Sign up for a 1:1 Success Clinic. Make sure to get one of these on your calendar, and quickly – they fill up as fast as the breakout sessions do. The 1:1 Success Clinic is a personal appointment with a SFDC employee, designed to provide answers or solutions for whatever you may be struggling with. When you schedule it online, be prepared to give them details on what you would like to discuss. Bring your questions/issues with you – and keep in mind that you will only have 30 minutes. I’ve found that this is only enough time to resolve one or two things, so ask the highest priority question first. My 1:1 Success Clinic has sent me home with great ideas each year, so don’t pass it up – it could be the best learning experience of your entire week!

Know where you need to be, and when. Keep your schedule with you, as well as a map of the conference meeting rooms. This gets easier every year with the handy Dreamforce app, and they also include printed maps in your conference materials. If you are attending a “Hands On” session, get to the room early so you can get a computer station. The Moscone Center covers several city blocks – and last year it was not large enough for all of the sessions, so some of them were across the street at the Marriott. If you will be running from one side of the conference center to the other, wear comfortable shoes. And if you want to save your sanity, do not wait until right before the first sessions to pick up your materials – do that the night before.

Take notes. There is no way you will remember everything that you want to remember. Take tons of notes during your sessions, and keep a list of to-dos for when you return to work. If you are like me, some of your notes might not make sense later – but Dreamforce will post recordings of the sessions after the conference is over. Re-watching my favorite sessions always helps me remember what I liked about them and what I wanted to implement in my own database.

Beware the Cloud Expo floor. Okay, it isn’t as negative as it sounds, but the Cloud Expo requires some planning as well as the rest of the conference. Almost every company with a booth in the Cloud Expo is going to contact you if you let them scan your badge – and some of them will call you and spam you incessantly. Keep that in mind before you go around snapping up free pens, keychains, zip drives, mouse pads, and entries to win whatever piece of technology they’re giving away this year. If there are some products you want to look at, use the Cloud Expo map to locate the ones you are truly interested in. This strategy has saved me a lot of time-wasting calls that usually end with me saying “Sorry, I only stopped by your booth because I wanted a free stuffed animal, don’t call me anymore.”

Mingle! The entire Dreamforce conference is designed to be a learning experience, and you will get a lot out of the sessions, the keynotes, and the 1:1 Success Clinic. But I have doubled my knowledge simply by meeting people and discussing my challenges with them. If you are there with co-workers, don’t walk around in a pack – break away and make some new friends! There are evening events and lunch groups that make it easy to meet people like yourself. No matter how well you know your job, someone else’s perspective on Salesforce is always valuable. And you might even have some fun.
My favorite Dashboard Chart

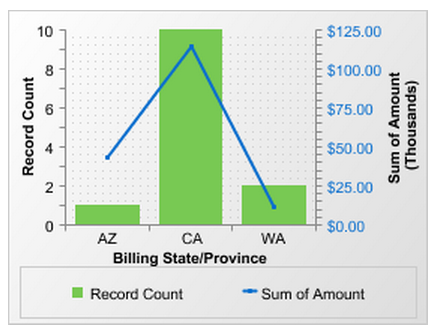
I used to create separate dashboard components for opportunity amount totals and for number of opportunities in the pipeline – until I discovered the combination chart. Not only does it give you both record count and dollar amount totals (saving space on the dashboard), it looks really cool! If you want to create one, it’s easy – follow my instructions below.

CREATE A SOURCE REPORT. For my combo chart, I’ve used an opportunity report, summarized by state, and specified a particular grouping of states in my report to represent a territory. You can do this based on opportunity owner, type, region, or any field that you use in your accounts or opportunities. Be sure that you summarize the opportunity amount in the Amount column.

ADD THE CHART TO YOUR REPORT. This step is important because you cannot create a combination chart at the dashboard level. Follow these guidelines to create the chart:

  • Click Customize on your report.
  • Click the Add Chart button.
  • In the Chart Editor, choose the vertical column chart type (at the top).
  • For the Y-Axis, select Record Count.
  • For the X-Axis, select the field that you used to summarize your report – in my example, it’s the Account Billing State/Province field.
  • Check the Plot additional values box where it says Combination Charts.
  • For Display, select Line.
  • Check the Use second axis box.
  • For Value, select Sum of Amount.
  • Optional: go to the Formatting tab and move the Legend Position from Right to Bottom – it tends to take up too much space to the right of the chart. You can also customize the look of the chart on this tab.
  • Click OK and then save your report.

ADD THE COMPONENT TO YOUR DASHBOARD. On your dashboard, drag the vertical column component into the dashboard area. For your Data Source, select the report you just created. Go into the component edit screen – at the top left is a checkbox labeled Use chart as defined in source report. Check this box, click OK, and save your dashboard. Ta-da! Now you have opportunity record totals and amount totals all in one chart.

How I Passed the Certified Admin Exam

First of all, you may be wondering: why get certified at all? I wondered that myself for several years – and now, I’m very glad I did it. My reasons might not be the same as everyone else’s but they are darn good reasons, if I do say so myself:

Reason #1: It will look good on your resume. If this is not a good enough reason, see reason #2.

Reason #2: You will be taken more seriously as a SFDC admin. Personally, I don’t care about putting my certification on my resume – I’m not actively looking for employment. But my colleagues consider me a subject matter expert, and now I’m the go-to person for Salesforce questions.

Reason #3: It will force you to stay up-to-date on all of the latest releases. You don’t just get certified and then sit on your backside. You have to take a short online exam each quarter on the latest features and improvements. This has kept me up-to-date far better than the sporadic perusing of release notes a couple times a year.

Here’s a bonus reason: You don’t actually have to take the recommended training class to prepare for the exam! There are study guides, sample exam questions, and the help documentation in your own database (which, honestly, contains all of the answers you will need). Here are my recommendations for preparing for the Certified Administrator Exam:

  • Know that there is no way to cheat. Oh, don’t look so shocked – exam-takers of all ages have made an art form out of scribbling a couple of notes down in the hopes that they will be able to sneak a peek during a test – on their hand, their leg, wherever. Just know that this exam does not tolerate that practice – everything you know needs to be stored securely in your head.
  • Use Google (or your search engine of choice). Just search “Salesforce.com Certified Administrator sample exam” or similar, and you will get lots of sample exams, sample questions, and blogs with great advice.
  • Download the Study Guide. You can download the study guide from the Administrator Certification page – this page also shows a couple of sample questions. I found the Study Guide particularly useful because it gives you an exam outline complete with weighting – this way, you know which areas make up the largest portion of the exam.
  • Do lots of tedious reading. In my opinion, this is the main reason I passed my exam without formal training. I went to each and every link in the left-hand column of the Setup page, and clicked that little button in the upper right that says “Help for this Page.” I read all of the help pages that came up. I also took notes. Although you aren’t allowed to bring notes to the exam, writing things down will help cement the information in your mind.
  • Look for things in the documentation that would make good test questions. We’ve all taken multiple-choice exams, we know how the questions work. So when you see something in the documentation that says, “You can define this object in one of the four ways,” take note! That is a multiple-choice question just waiting to happen. Also be on the lookout for really specific statements such as, “Only one quote can sync to an opportunity at a time,” or “Each picklist value can have up to 40 characters.” Because you are dealing with multiple choice questions, they will be very specific. Memorization is crucial.
  • When you get tired of reading, watch video tutorials. The Learning Center has plenty of material to watch, and the interactive nature of the demos will help you retain more information.
  • Take it seriously. Spend several weeks studying. Get a good night’s sleep and eat properly beforehand, and show up early on exam day. The time allotted will be more than enough, so mark questions for review and come back to them if you get stumped.

I believe that anyone can prepare for the exam and pass it, without taking a class beforehand – if I did it, so can you! Now I’m going to apply this advice to preparing for the Certified Developer exam – so wish me luck.