The Unselfish Admin, Part 1: Creating Usability

In the Salesforce admin world, the word “usability” has been thrown around so much that I’m not sure we really know what it means anymore. When asked about the usability of their own Salesforce orgs, most experienced admins respond with one of the following:

“Look how pretty my dashboards are!”

“Of course it’s user-friendly, I built it!”

“Duh! Salesforce is so easy to use, I can’t imagine why all these dummies are struggling with it!”

Sure, all of our customizations work. We are great at what we do, and we test everything thoroughly. But functional does not equal user-friendly. The stronger your admin skills become, the easier it is to forget what it’s like for a non-admin to deal with all of the configuration you’ve put in place. I can say this because I fall into that trap on a regular basis. I have had negative feedback (gasp!) from my users. And if you’re being honest, so have you. Here are some complaints that I have heard – and some potential solutions that will make things easier on your users.

The first time I heard this one, I had to laugh. I mean, this from the same people who are constantly asking me to create custom fields for all the data that they want to track? But then I took a closer look at my page layouts. Show of hands – who actually looks at the profile access checkboxes and carefully selects the appropriate ones every time they create a custom field? (Mm hmm. That’s what I thought.) Why have more than one profile if you’re going to let everyone see the same data?

  • Clean up your page layouts. Take a very close look at the page layout assignment, and I bet you will find fields on every layout that aren’t even relevant to certain profiles. Hide those fields from their layouts. Make sure that you have the right page layout for each set of users, specific to their department, territory, or business line.
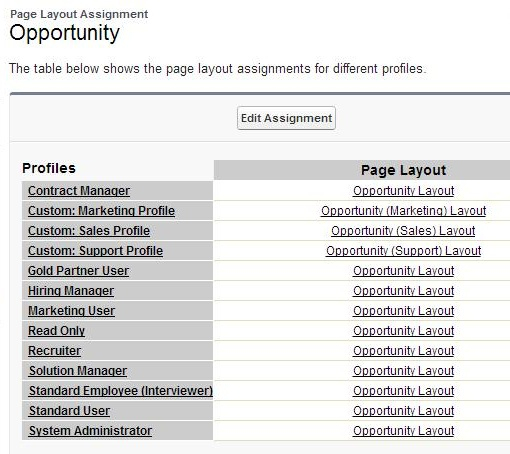
  • Clean up your field-level security. If you don’t have many page layouts, or if they are all fairly similar, then field-level security is nearly as good as cleaning up layouts. By removing field access from certain profiles, you de-clutter their view. Note: you will also remove their ability to report on those fields, so keep that in mind.
  • Then look at your field-level security again. If you have multiple users editing one record, and they are responsible for different pieces of data, another great option is to make fields read-only for the profiles who will never be editing that info. You can do this while editing your page layouts.

This is the most common complaint, and the most vague. However, it’s also an indication that your users need some kind of training. You can’t just tell them to “click on the Help For This Page link at the top of the page” – come on, seriously? Have you read that stuff? It’s written for admins! What your users need is simplicity. Mastering the full functionality of your company’s Salesforce implementation should be in nobody’s job description but your own.

  • Put together some training documentation of your own. Make it short and sweet, with lots of screenshots and not too much text. Remember, think from the perspective of the user. They don’t want to spend any more time in Salesforce than they have to. Make it easy for them to see what they need to see, update their records, and go about their day. And if you really want to get crazy, Salesforce even allows you to redirect those help links!
  • Add help text to as many fields as possible. It’s so easy to hover over the little question mark next to a field and have a detailed explanation of what data is expected. This will save your users from entering the wrong data or from having to ask what should be there. Put some thought into it, and write a snippet of help text for every field that is not super-obvious (and I mean obvious to users, not to an admin).
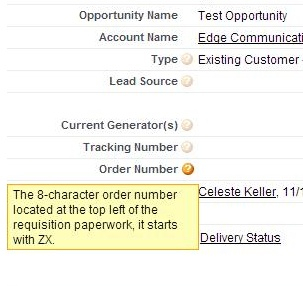
  • Use required fields and validation rules to collect all required data. Just like making fields read-only on page layouts, you can also make fields required. But before you do this, make sure that there will not be a scenario where that field would not be required! For instance, you can’t make “Order Number” required in an opportunity if you sometimes create opportunities before you have the order number. For those instances, you’ll want to create validation rules. Note: when you create a validation rule, be sure to make your error message very detailed. A validation rule should tell your users that more data is required in a specific field – it should not frustrate and confuse them.

I have had very smart people shake their heads in fear when I offer to show them how to create their own reports. Why are our users so terrified of reports? Could it have something to do with the hundreds of custom fields we’ve created…?

  • Create custom report types with limited available fields. It sounds silly, but trust me – when your users see the short list of available fields on the left side of the report builder, they will be far less overwhelmed. Even I get frustrated scrolling down that huge list of available fields while building reports. Here’s a quick how-to:
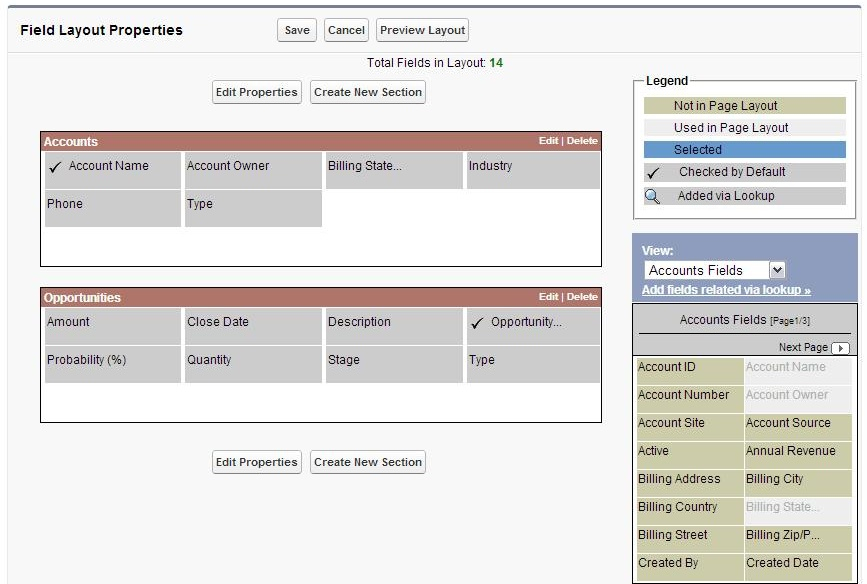
  • Go to Setup | Create | Report Types and click “New Custom Report Type.” Give it a name and a description, select the objects you want in the report, and save. Then scroll down and click on “Edit Layout.” This shows you all of the fields available from the objects in your report type. Simply take all of the fields you do not want visible in the report builder, and drag them over to the right. Check it out – I’ve got an “Accounts with Opportunities” report that only allows 14 fields!
  • Once you have some super-simple custom report types created, go one step further and create report templates for your users. Put them in a read-only report folder – name it something like “Public Report Templates” – and then show your users how to customize those reports and save them to their own folders. Not only are you empowering them, but you save yourself all the time you’d be spending creating reports for everyone. (I know, that part is not 100% unselfish…)

The bottom line: be an unselfish admin, and your users will find Salesforce so easy to use that they might even start to like it! Or at least they’ll be happy to know that you care.

New and Improved: Opportunity Teams

I was never a fan of Opportunity Teams (previously known as Sales Teams), because they didn’t do anything that I couldn’t accomplish with sharing. But in the Winter ‘13 release, teamwork took on a whole new meaning when the Opportunity Team became its own object. If you have multiple people working on an opportunity who have different roles and different access needs, then you should be taking advantage of this awesome, super-improved functionality! When properly customized to fit your business needs, your users will find the level of detail much more useful than before. And as an administrator, you will be able to add custom fields and validation rules – just as you would with any other object.

To get started, go to Setup | Customize | Opportunities | Opportunity Teams | Settings, check “Enable Team Selling” if it’s not already checked, and click Save.

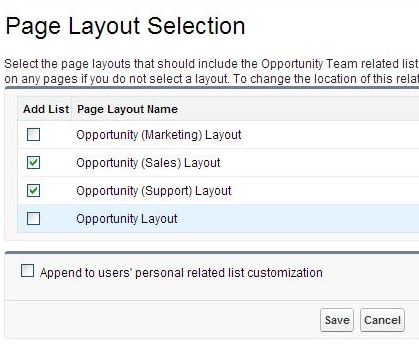
You will then be given the option to select which of your opportunity page layouts to display opportunity teams on.

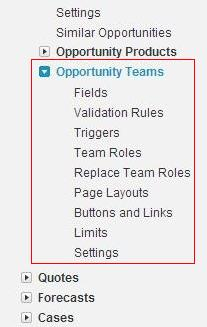
Once you do that and click Save, your customization sidebar will contain a new list of options for opportunity teams.

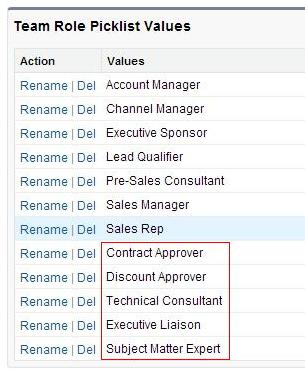
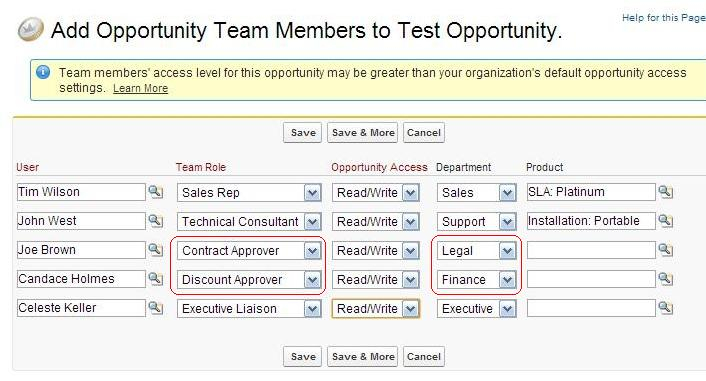
The opportunity team object will contain some standard fields already, such as User (lookup), Team Role (picklist), and Opportunity Access (picklist). Depending on how your users relate to an opportunity, you may want to add values to the Team Role picklist. It comes with several default values, but I added a few of my own:

You may also want some custom fields – for instance, I added a “Product” field that is a lookup to the product object. If your opportunities contain multiple products, this is a great way to show which product each team member is responsible for selling. I also added a “Department” picklist.

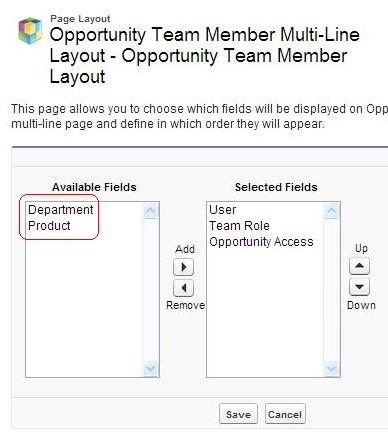
When you create custom fields on opportunity teams, it’s helpful to add them to the multi-line layout as well as the page layout, so that when new team members are added, all information can be entered at once. To do this, go to your opportunity team member page layout, click Edit, and then select the “Edit Multi-Line Layout” option up at the top.

Then move your new custom fields from the left to the right:

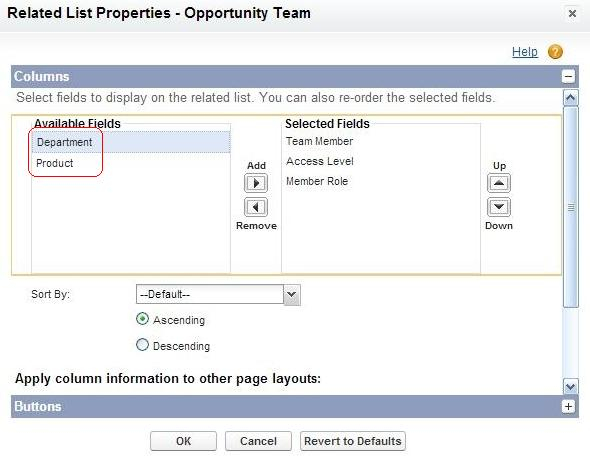
You will most likely also want them to show up on the opportunity’s list of team members, so you will also need to add them to the related list on the opportunity. To do this, go to an opportunity page layout, click Edit, and then select the wrench icon on the opportunity team related list.

Again, move your new custom fields from the left to the right:

Once you have moved your new custom fields over, you can update that related list on other opportunity layouts – before you click “OK,” scroll down and you will see the “Apply column information to other page layouts” option. This saves you the trouble of editing the same thing on every layout.

Now you are ready to add team members to an opportunity! Scroll down to the Opportunity Teams related list, click Add, and start adding users. If you need to make sure that only certain users have specific roles, you can also create validation rules on the opportunity team object to ensure data accuracy. For instance, I created rules to make sure that only users in the Legal department could be assigned the “Contract Approver” role, and only users in the Finance department could be assigned the “Discount Approver” role. (Another good option is to have your custom fields populated by a trigger.)

Click Save, and that’s it! Now you have a more complete look at the function of each member of an opportunity team.

There are many more ways to make use of this new object. Use multiple page layouts if you need varied levels of security – just as you would with any other object. Create custom report types with just the fields that you want your users to see. And create default opportunity teams  or clone opportunity team members to make the process faster.

A few things to keep in mind:

  • Workflow rules cannot be created on opportunity teams.
  • Triggers and validation rules are not supported when default teams are added to an opportunity.
  • An opportunity team cannot be the primary object in a custom report type (I recommend using Opportunities, then include Opportunity Teams).

For more detail, refer to the Help and Training documentation.

The Value of a Bucket

I know what you think when you see “value” and “bucket” in the same sentence…

This is not about that kind of bucket.

This is about one of the most valuable reporting features I’ve ever seen in Salesforce. It’s so cool that they were blogging about it in Europe a year ago. With a matrix report example, no less.

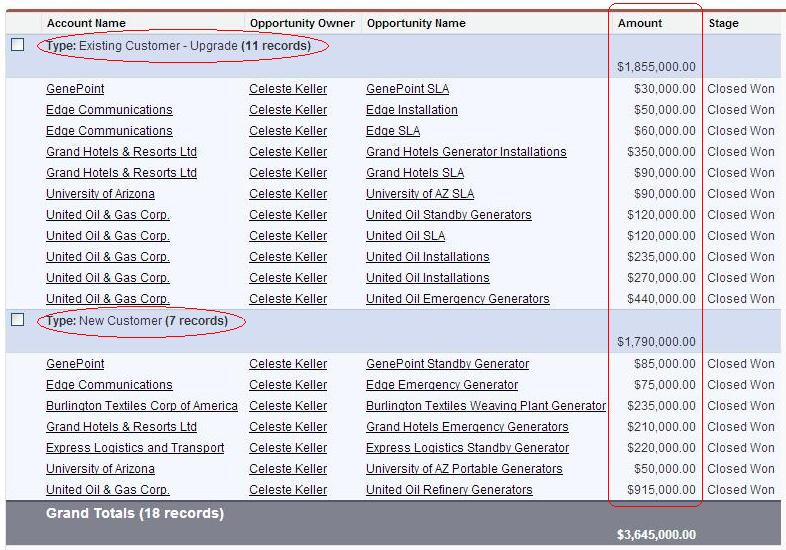
About 90% of the reports I create are summary reports. Before the bucketing feature, I had many opportunity reports that looked something like this:

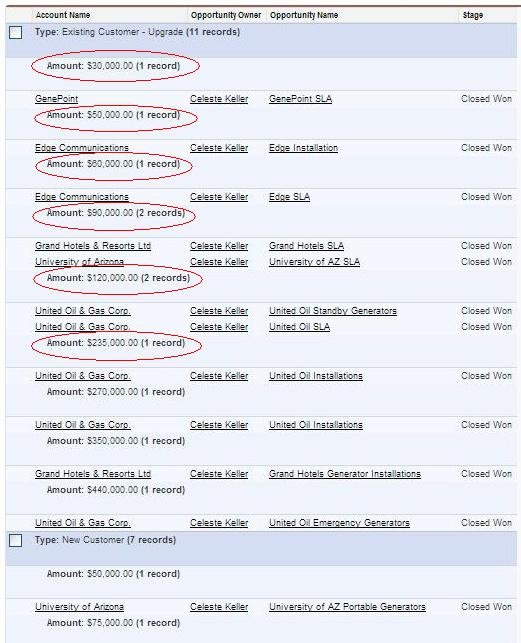
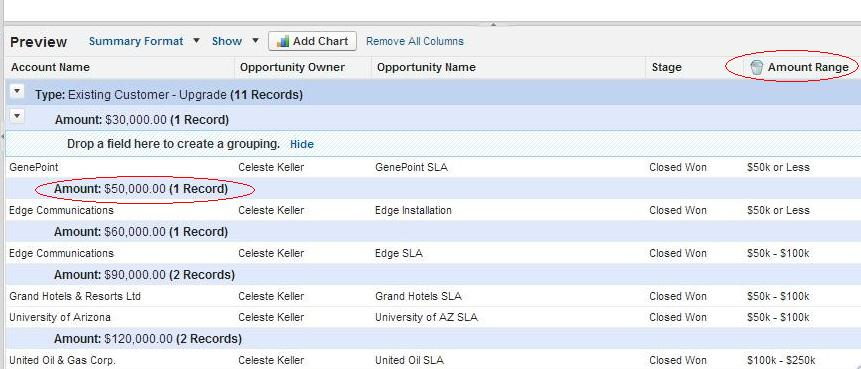
Which is fine, but… what if I also wanted to summarize by opportunity amount? They almost all had different amounts, so naturally I ended up with a mess like this:

And then along came the bucketing feature, making it easy to group data into ranges that you can set to suit your unique business needs. It’s been available for about a year now, but many admins have not fully experimented with it. So here’s a simple how-to:

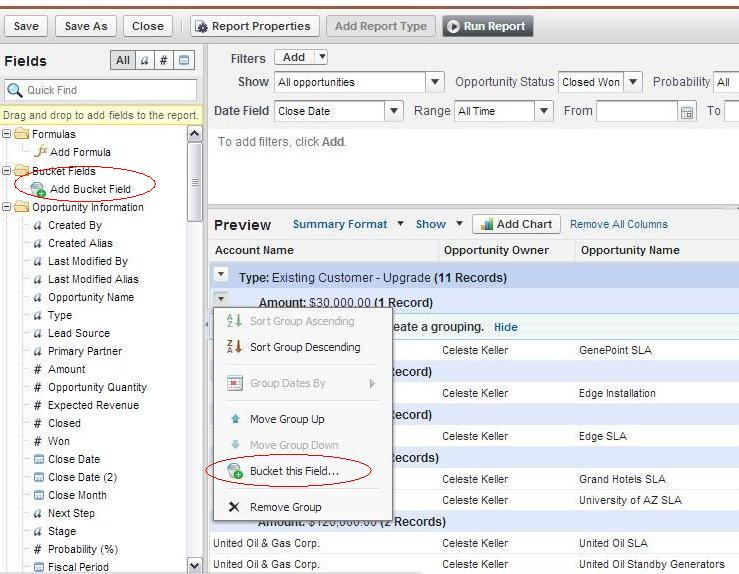
  • In edit mode, you can either choose Add Bucket Field from the menu on the left-hand side, or – if the field you are bucketing is already on your report – click the arrow and select Bucket This Field.
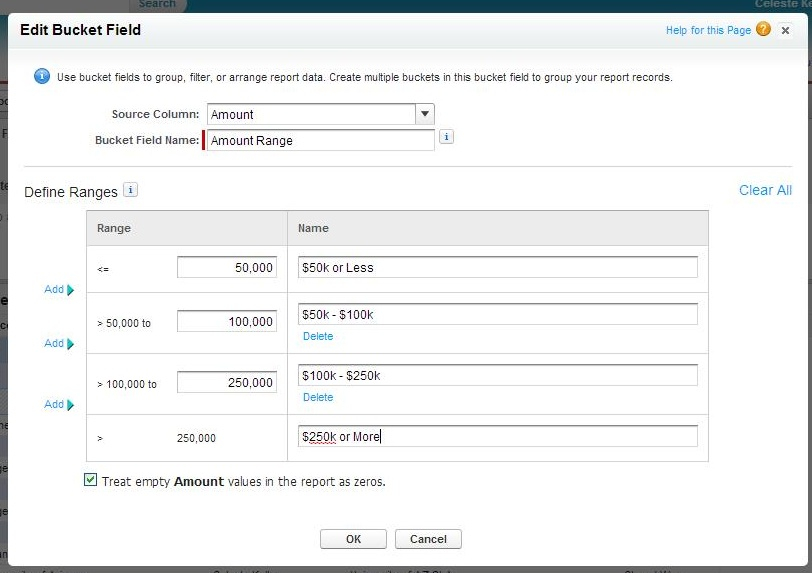
  • Give your bucketed field a name. Then you can begin entering the various ranges that you want to see on your report – and on the far left, you can click “Add” to get another level of bucketing.
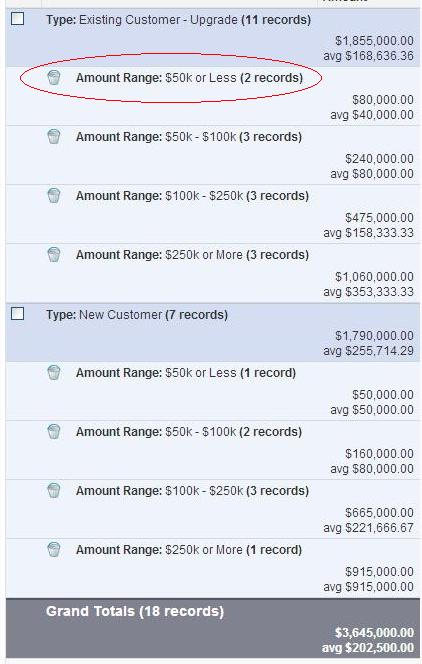
  • Once you’ve set your ranges and saved the bucket field, it shows up on your report – all you need to do now is to switch it out with the field that was originally used to summarize!

To be extra fancy, I decided to keep the amount column in my report, for averages as well as totals. Once the details were hidden, I had a nice clean list – with amount ranges that made sense for my business.

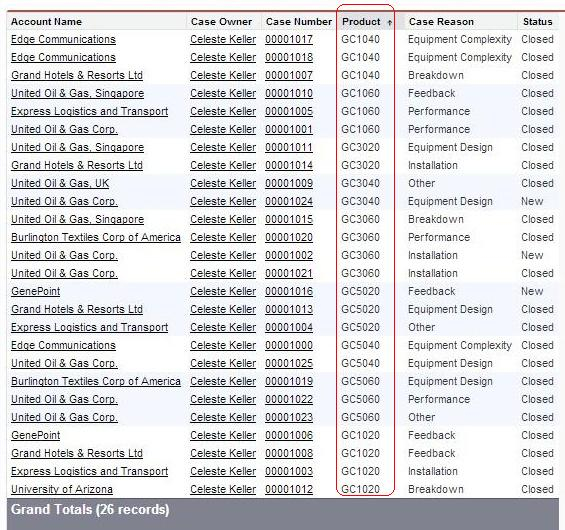
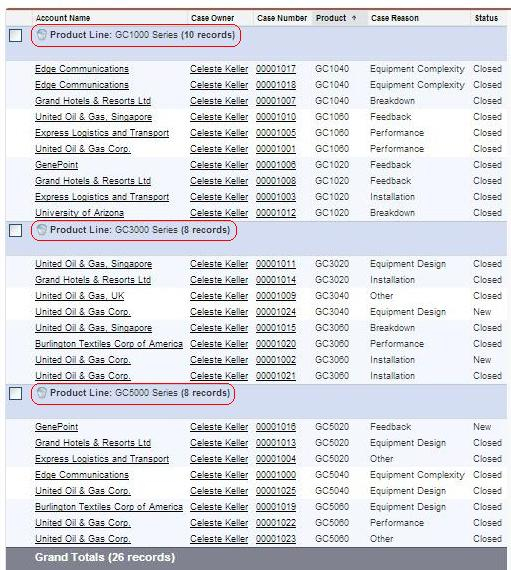
The best thing about this feature is, it is not limited to numerical fields. You can bucket text fields, and even picklists! For instance, here is a messy case report – let’s say we want it broken down into three product lines, but we don’t have a field for product line, and we’ve got nine products. Here are the before and after shots:

Impressive, huh? More detailed instructions on the various ways to create a bucket field (including the above picklist buckets) can be found here. I hope you find it as fun as I did, and customize your reports even more than you thought possible. Happy bucketing!

The Name Game

I had the craziest dream this past weekend… I was part of a group of SFDC admins who were locked in an asylum for no discernible reason. We had to locate and deactivate a series of records in a database in order to get out of the asylum. But we couldn’t find them because they all had bizarre, illogical names!

It sounds silly, but it was a really disturbing dream – most likely brought on by combining the pressures of my new job with a marathon of American Horror Story: Asylum episodes. My reaction to the nightmare was (naturally) to dissect it. What if those records had been easier to find? Could we all have won our freedom if there was a simple naming convention in place?

As far back as 2005 (I know, right? Did we even have internet back then?) Toshiba America Medical Systems, a.k.a. TAMS, put naming conventions in place from day one as they implemented their CRM system. An employee was quoted as saying “It’s very clear what each report is. We use descriptions by month, quarter, half. We don’t use technical names.” This practice extended to files and documents as well, to make sure that everything had the same look and feel.

In the years since then, many articles have been written on data integrity, all with similar points, but one that really stands out is standardized naming conventions. It seems like such a little thing, but think about it – how many duplicates have you seen that have massive, obvious differences? None! Duplicate records in your database will most likely have some tiny, almost uncatchable detail that makes them ever so slightly different. Do you leave the “Inc” and “LLC” at the end of the account name? Do you allow punctuation? “Google.com” and “Google Inc” and “Google, Inc.” could end up as three duplicate accounts if you don’t have some kind of a rule for that. And don’t even get me started on international phone numbers…

Another great way to avoid slight variances in duplicate data is to use picklists instead of text fields. Nothing is more annoying than trying to run a report summarized by country and getting separate totals for England, UK, United Kingdom, The United Kingdom, Great Britain, etc. If you create a picklist with country names formatted to your liking, you can avoid simple human error altogether. Personally, I am a big fan of the globally accepted two-character country abbreviations.

Still not convinced? I have seen dozens of job postings lately that place heavy emphasis on data naming and standardization. One of the Professional Qualifications I saw listed? “Proven ability to create naming conventions, formats, and standards for data.”

Don’t know how to fix your naming issues? Well, I can’t write your naming convention for you – they are all different. But here are the three steps to solving the problem:

  • Decide on naming conventions for the objects and/or fields in your database which are causing your data issues, using logic and feedback from each department of your organization.
  • Put validation rules, picklists, and workflow rules in place to automate and avoid errors.
  • Go back and clean up the existing data! This is the last step because it will take the longest – that’s why it is best done after your new procedure is in place. (Be careful if you are changing the field type!)

Trust me – strong naming conventions just might keep you (and your users!) from going crazy.